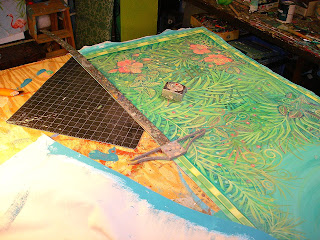
 I use the trim and seal method of finishing the edges. Traditionally, the edges of floorcloths were folded over to form a hem and either sewn (18th century style) or glued. This results in a raised area all around the floorcloth. I don't think it's as clean a look, and over time the raised area can get scuffed and look messy. I really like my method, the floorcloth lays flatter on the floor this way too.
 Trimming is nerve wracking work. The blade has to be very sharp, to make a clean cut. Any mistake, if the knife slips into the artwork part, cutting on the wrong side of the ruler ( I did that once a long time ago:ARGH!) are totally the end of the world. Its a good idea to be able to really concentrate on this job.
 On a later post, I will explain and show the sealing part. For the moment, I am eager to get the new piece on the table and primed.....
I prime the stapled down "back" 3-4 times, and when its dry, turn the whole piece over stretch and staple it down and prime the ''front'', (art work side) 3-4 times too, and then begin to paint up the background for the artwork. The primer is a very flexible acrylic gesso, with lots of PVA in it...similar to what theatre stage scenic drops are made of. Theatre drops get rolled up and dropped down over and over, any paint work has to be able to stay put and flexible during all that activity. PVA based paints are used for many painted theatre props , so they can survive getting knocked about without too much chipping or cracking. 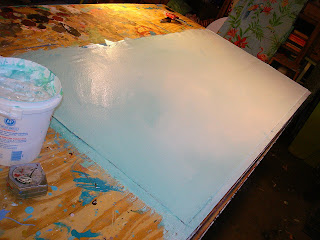
 Here is the the start of the companion floorcloth to the one just finished. It will go at the sink, in the kitchen. (Tile Project Revisited )
These same materials ensure floorcloths can be rolled up, and stay flexible, and adhere well to the floor surface.
And they really do hold up well. I have come to realize over the years that floorcloths painted in this way are extremely durable, and endure even heavy traffic, getting wet all over by weather or washing, and can be out of doors, (under cover, mainly to prevent fading of the artwork. )
Here is the the start of the companion floorcloth to the one just finished. It will go at the sink, in the kitchen. (Tile Project Revisited ) The art work part is done, now I will protect it with 3-4 coats of satin (in this case) acrylic urethane. Then I will pull the staples and trim and seal the edges.


 But here you can see the fish looking like they are pretty happy swimming around....
 The canvas is primed, on both sides....And the work begins.....


 Click on the pictures to see them larger.


 After....
 Before firing.....
